
How to Activate Your TNG NFC Ring via TNG eWallet
14th September 2026 | by Umar Shahren
Just received your TNG NFC Ring? Let’s get it ready for your first tap.
Your TNG NFC Ring follows the same linking process as an enhanced Touch ’n Go NFC card. Open TNG eWallet, add it under TNG Card, scan your ring and follow the instructions to finish linking it.
You can scan your ring in either of these two ways:
- Directly: Hold the ring against your smartphone’s NFC reading area.
- Inside its casing: Keep the ring inside the tapje.la casing and hold the casing against the same area.
Both methods scan the same ring. Choose whichever is easier for you to hold steady.
Before You Start
Have these ready:
- Your TNG NFC Ring.
- A compatible NFC-enabled smartphone.
- The latest TNG eWallet app, with your account logged in.
- An internet connection.
- Your tapje.la ring casing, if you prefer to scan with the ring inside.
Complete account verification if the app requests it. On Android, make sure NFC is switched on.
Step 1: Open TNG Card in Your eWallet
Open TNG eWallet and select TNG Card from the home screen.
Tap Add Card or the + icon, then choose Scan Now or the NFC scan icon.
Wait for the scanning prompt before bringing your ring to the phone. The app may use slightly different labels as its layout changes.
This follows the official enhanced TNG card linking process.
Step 2: Choose How You Want to Scan Your Ring
Method 1: Scan the Ring Directly
- Take the ring out of its casing.
- Hold it close against your phone’s NFC reading area.
- Adjust its position or angle gently if it is not detected.
- Once scanning starts, hold it still until the app confirms the scan is complete.
Think “tap and hold”, rather than a quick tap. Pulling the ring away too early can interrupt the scan.
Method 2: Scan with the Ring Inside Its Casing
Prefer to keep the ring in its casing? You can scan it that way too.
- Make sure the ring is inside the tapje.la casing.
- Hold the body of the casing close against your phone’s NFC reading area.
- Keep the carabiner and any attached keys away from the scanning point.
- Adjust the casing’s position gently until the phone detects the ring.
- Hold it steady until the app confirms completion.
The ring must be inside. An empty casing cannot link or reload your ring.
If scanning through the casing is difficult, take the ring out and try Method 1.
Where Should You Hold It?
| Phone | Where to start |
|---|---|
| iPhone | Near the top of the phone’s back, beside the camera. |
| Android | Around the middle of the phone’s back; the exact position depends on the model. |
The reading position varies by device. See the official TNG scanning guidance, or check your phone manufacturer’s instructions.
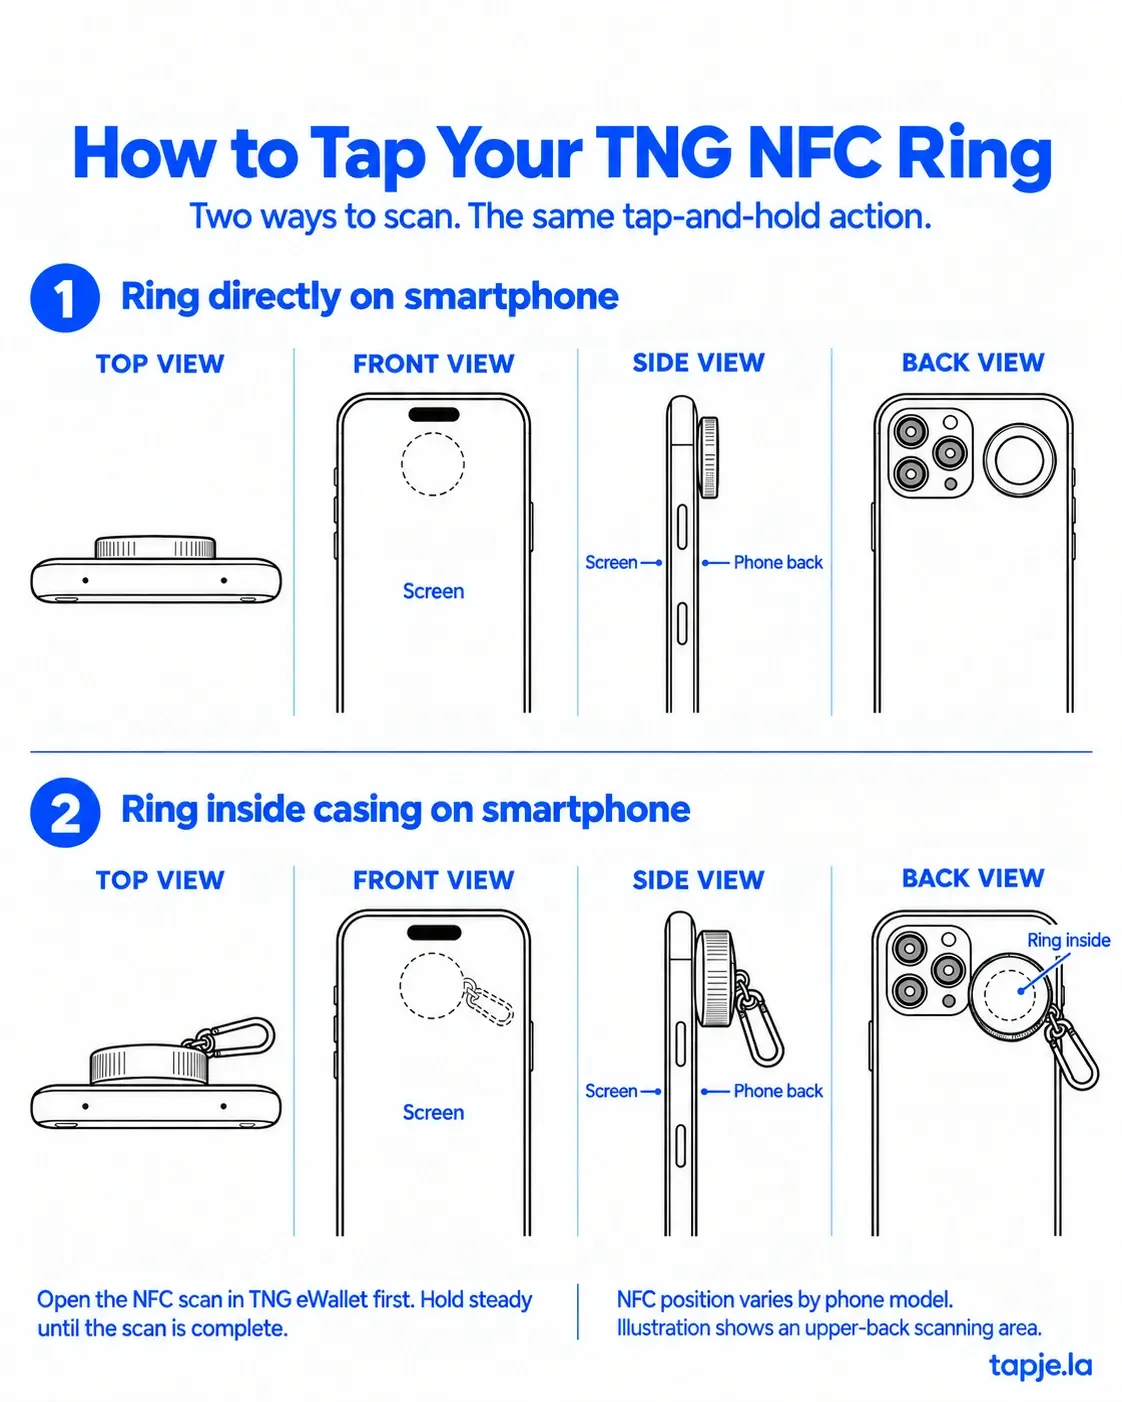
Step 3: Confirm and Finish Linking
After a successful scan, follow the app’s prompts to confirm the detected card details and complete any requested authentication.
If a name field is available, choose something easy to recognise, such as My TNG Ring.
Once it appears in your TNG Card list, linking is complete.
Already see your ring there? Select the existing entry to reload it.
Step 4: Reload Before Your First Journey
Linking your ring and adding money are separate steps.
To reload:
- Open TNG Card and select your ring.
- Tap Reload.
- Scan your ring when prompted, using either tapping method.
- Choose the reload amount and authorise the payment as instructed.
- Scan the ring again when prompted to complete the reload.
- Keep it in place until the app confirms success.
Do not stop after payment authorisation—the final scan is part of the reload process. These steps follow the official enhanced TNG card reload instructions.
Check the ring’s balance before setting off. Having money in your eWallet does not, by itself, mean that money has been loaded onto your ring.
Phone Not Detecting Your Ring?
Try these simple adjustments:
- Check the scanning screen. Start the NFC scan inside TNG eWallet first.
- Find the right position. Move the ring a little, pause, then try another angle.
- Hold it steady. Avoid repeatedly tapping and lifting it away.
- Remove your phone cover. Try without thick covers, magnetic attachments or card holders.
- Keep other cards and keys away. Scan one item at a time.
- Try the ring directly. Remove it from its casing to make positioning easier.
Still having trouble? Contact tapje.la with your phone model, the error message and whether you scanned directly or through the casing. This helps us guide you more quickly.
Frequently Asked Questions
Is activating the TNG NFC Ring the same as activating a TNG NFC card?
Yes. It uses the same TNG eWallet linking workflow as an enhanced Touch ’n Go NFC card. In this guide, “activation” means adding and linking your ring to the app so you can manage it and reload it.
Do I need to remove the ring from its casing?
No. You can scan it while it is inside the tapje.la casing. If your phone has difficulty detecting it, remove the ring and scan it directly.
Do I need to activate both the ring and the casing?
No. You are linking the ring. Keeping it inside the casing simply gives you another way to hold and scan it.
Can I use the same tapping methods for reloading?
Yes. Scan the ring directly or keep it inside its casing. Whichever method you choose, keep it steady and complete every scan requested by the app.
Why does my ring appear under TNG Card?
The ring follows the enhanced TNG NFC card workflow, so you manage it through the app’s TNG Card section.
Ready for Your First Tap?
Link your ring. Complete your reload. Check your balance.
A little practice finding your phone’s NFC reading position makes future scans much easier.
Need a hand? Contact tapje.la support and we’ll help you get started.